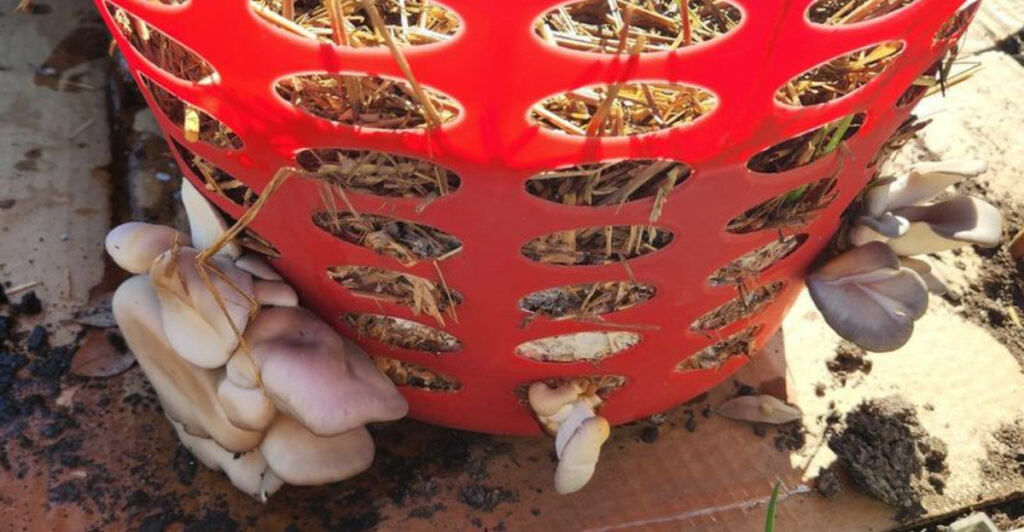
Growing your own oyster mushrooms is not just sustainable but incredibly rewarding. This guide transforms an ordinary laundry basket into a thriving mushroom habitat, making it both easy on the wallet and accessible for beginners.
With ten simple steps, you’ll be on your way to cultivating delicious, home-grown mushrooms, perfect for enhancing your culinary creations.
Whether you’re a mushroom enthusiast or a curious gardener, this method is bound to bring a sense of accomplishment and excitement to your horticultural endeavors.
1. Gather Your Materials

Begin your mushroom-growing adventure by gathering all necessary materials. You’ll need a laundry basket, mushroom spawn, straw, and a plastic liner to create the perfect environment. Make sure the basket is breathable, enhancing air circulation crucial for growth.
Choosing the right spawn is essential. Opt for a reputable supplier to ensure high-quality mushrooms. Use fresh straw as the substrate; it’s affordable and effective. The plastic liner helps maintain moisture, essential for mushroom development.
Having everything at hand simplifies the process, ensuring you can focus on creating the perfect growing conditions for your fungi.
2. Prepare the Straw

Preparing the straw is a fundamental step that requires patience and precision. Start by soaking the straw in water overnight, which softens it and makes it suitable for mushroom growth. This soaking process is vital as it ensures the straw is adequately moist.
After soaking, drain the excess water by spreading the straw out on a clean surface. Proper drainage prevents sogginess, which can hinder mushroom development. The prepared straw acts as a nurturing bed for the mushrooms, providing the nutrients they need to flourish.
Doing this right sets the stage for successful cultivation.
3. Layer the Basket

Layering your basket is an art that marries precision with creativity. Begin by placing a layer of straw at the bottom, followed by a thin layer of spawn. Alternate these layers until the basket is nearly full, ensuring even distribution of spawn.
This layering technique is key to successful mushroom growth, as it optimizes the mix of nutrients. Each layer provides a new opportunity for mushrooms to sprout and multiply.
Take care to avoid overpacking, as mushrooms need space to grow. This careful arrangement is a crucial step towards a bountiful harvest.
4. Cover and Incubate

After layering, it’s time to cover the basket with the plastic liner. This creates a humid environment essential for incubation. Place the basket in a dimly lit space, where it’s neither too hot nor too cold.
The incubation period is crucial as it allows the mycelium to colonize the straw. Keep the basket undisturbed for a few weeks, checking periodically to ensure the environment remains moist.
During this time, the anticipation builds as you prepare to see the fruits of your labor. Proper incubation is the key to a thriving mycelial network.
5. Monitor and Maintain Moisture

Maintaining moisture is vital to the success of mushroom cultivation. Regularly check the moisture level and mist the straw if it starts to dry out. Use a spray bottle to gently mist the surface, ensuring it remains damp but not soggy.
Moisture is essential for mycelium growth, acting as a catalyst for the development of mushrooms. Consistent maintenance ensures that the environment remains conducive for growth.
This step requires vigilance, but the reward is a healthy, thriving mushroom colony. Your attentiveness will pay off with a generous harvest.
6. Watch for Signs of Growth

As the weeks pass, keep an eye out for the first signs of mushroom growth. Small mushroom pins will start to appear, signaling that the mycelium is thriving. This is an exciting phase, as visible progress unfolds before your eyes.
Watching these tiny pins develop into full-sized mushrooms is both rewarding and fascinating. The appearance of these mushroom pins is a sign that your efforts have paid off.
Document this stage with photos, celebrating each new growth. This is a testament to your successful cultivation and dedication.
7. Harvest Your Mushrooms

When your mushrooms reach maturity, it’s time to harvest. Gently twist and pull the mushrooms from the straw, being careful not to damage the mycelium. Harvesting is best done in the morning when the mushrooms are firm and fresh.
This careful extraction ensures the mycelium remains intact for future growth cycles. Enjoy the bountiful harvest, knowing you’re reaping the benefits of your hard work.
Freshly harvested mushrooms are perfect for culinary experiments, adding flavor and nutrition to your dishes. Harvesting is the culmination of your efforts and a moment of pride.
8. Store Your Mushrooms Properly

Proper storage is essential to maintain the freshness of your harvested mushrooms. Place them in a paper bag and store in a refrigerator. This method helps preserve their texture and flavor.
Avoid plastic bags as they can trap moisture, leading to spoilage. Paper bags allow the mushrooms to breathe, extending their shelf life.
Stored correctly, your mushrooms can last up to a week, giving you ample time to enjoy them. This step ensures you make the most of your harvest, savoring the home-grown goodness at your leisure.
9. Rehydrate and Repeat

Once you’ve harvested, it’s time to prepare for the next cycle. Rehydrate the straw by soaking it again, repeating the initial preparation steps. This rejuvenates the straw, readying it for another round of mushroom growth.
Rehydration is crucial to ensure the straw remains a viable substrate. By repeating the process, you create a sustainable cycle of growth.
This continuous cultivation can yield multiple harvests throughout the year. Embrace the cycle, and enjoy the ongoing supply of fresh mushrooms. Rehydration ensures your efforts are rewarded time and again.
10. Share and Enjoy

Sharing your harvest with friends and family adds to the joy of mushroom cultivation. Prepare a meal showcasing your oyster mushrooms, celebrating the fruits of your labor.
This social aspect enriches the experience, turning your harvest into a communal event. Sharing not only spreads the joy but also inspires others to try mushroom growing themselves.
Enjoy the delicious taste of your home-grown mushrooms, knowing you’ve nurtured them from start to finish. Sharing is the ultimate reward, cementing your success as a mushroom cultivator.