
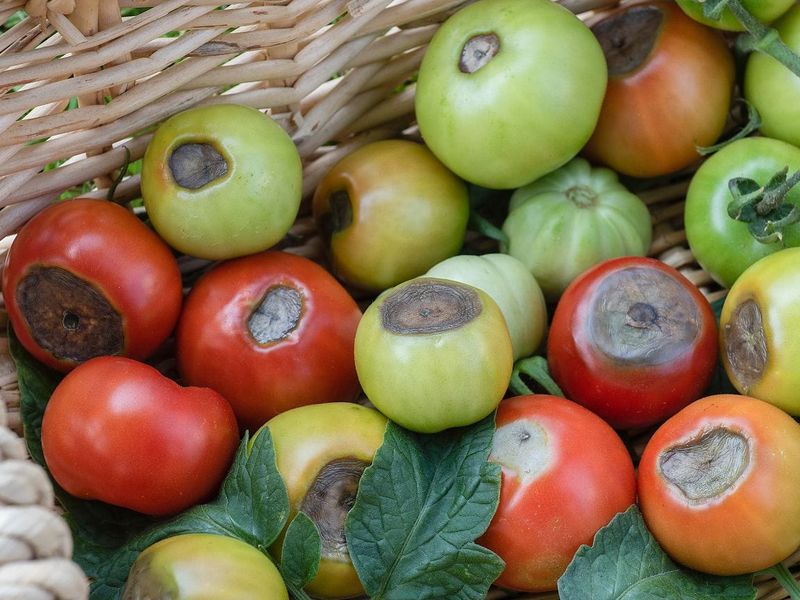
Watching a tomato turn red only to find a dark, sunken patch rotting on the bottom is one of the most discouraging moments in a summer garden. That damage has a name, and it almost always starts long before the fruit begins to color.
Understanding what triggers it gives you a real shot at protecting the fruit still coming on your plants.
A sunken patch opposite the stem points to blossom-end rot
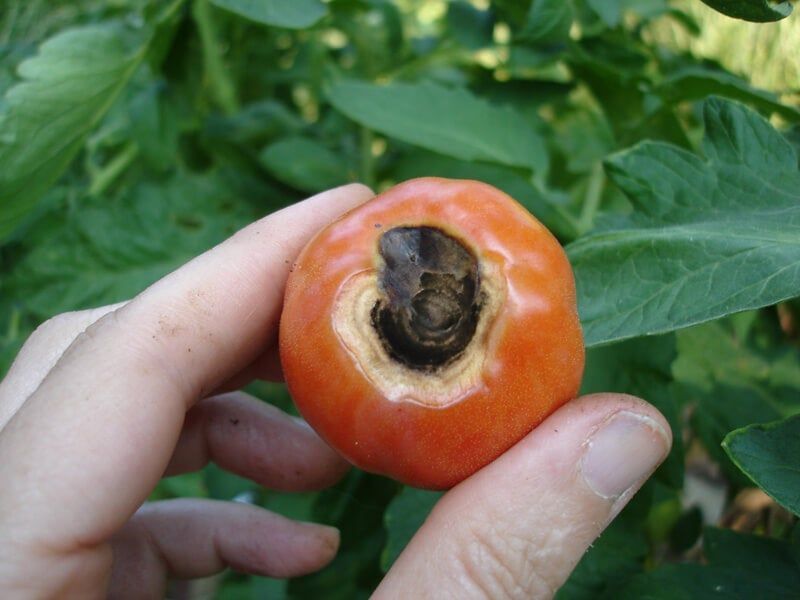
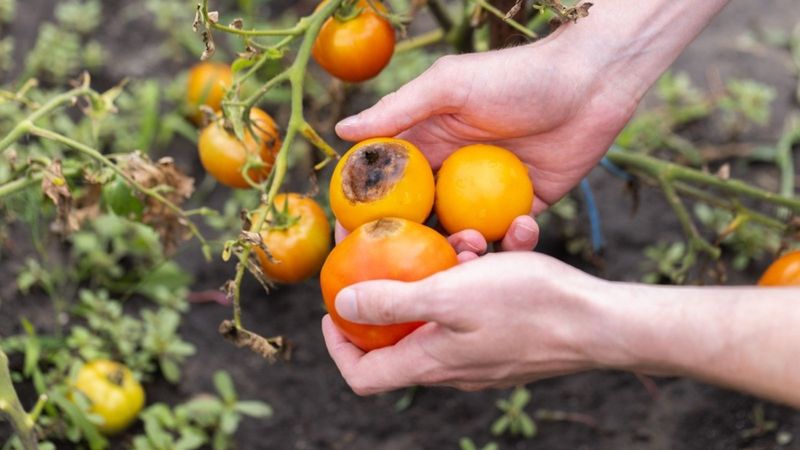
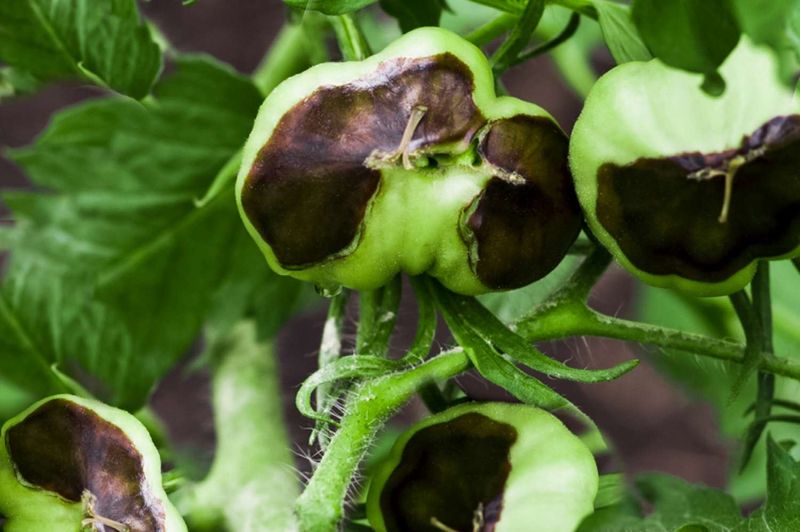
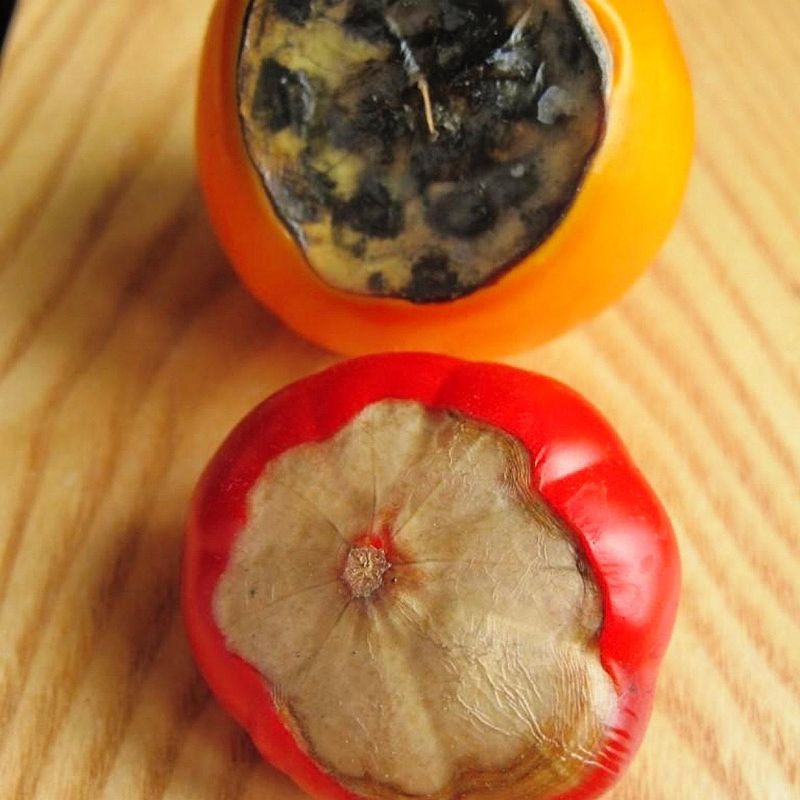
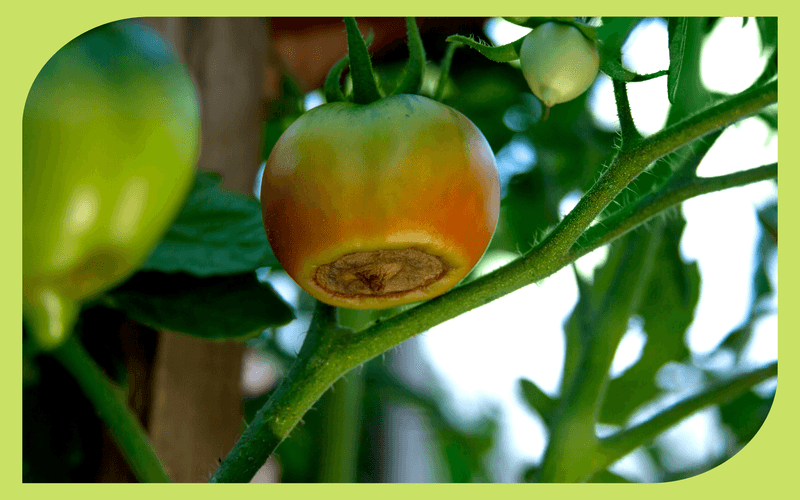
That flat, discolored patch at the bottom of your tomato is most likely blossom-end rot. The lesion appears at the blossom end, which is the end opposite the stem, and typically starts as a water-soaked tan spot before turning darker brown or black.
Over time it becomes dry, firm, and leathery rather than soft or oozing.
Blossom-end rot is a physiological disorder, meaning UMN Extension guidance on tomato disorders confirms it is not a contagious disease and not primarily caused by an insect. One plant can show it while the one right next to it looks fine.
Secondary fungi or bacteria may move into the damaged tissue later, which can make the lesion look worse or smell off, but those organisms are not what started the problem.
Reconsider this diagnosis if the damage begins at the stem end instead of the blossom end, appears mainly on the side of the fruit, or produces broad, mushy, foul-smelling decay across a large area. Those patterns are more consistent with anthracnose, bacterial soft rot, sunscald, or other disorders that call for a different response.
Texas A&M AgriLife Extension also notes that symptoms affecting leaves and stems alongside fruit damage point away from blossom-end rot and toward a disease that needs separate attention.
The damage often starts before the tomato changes color
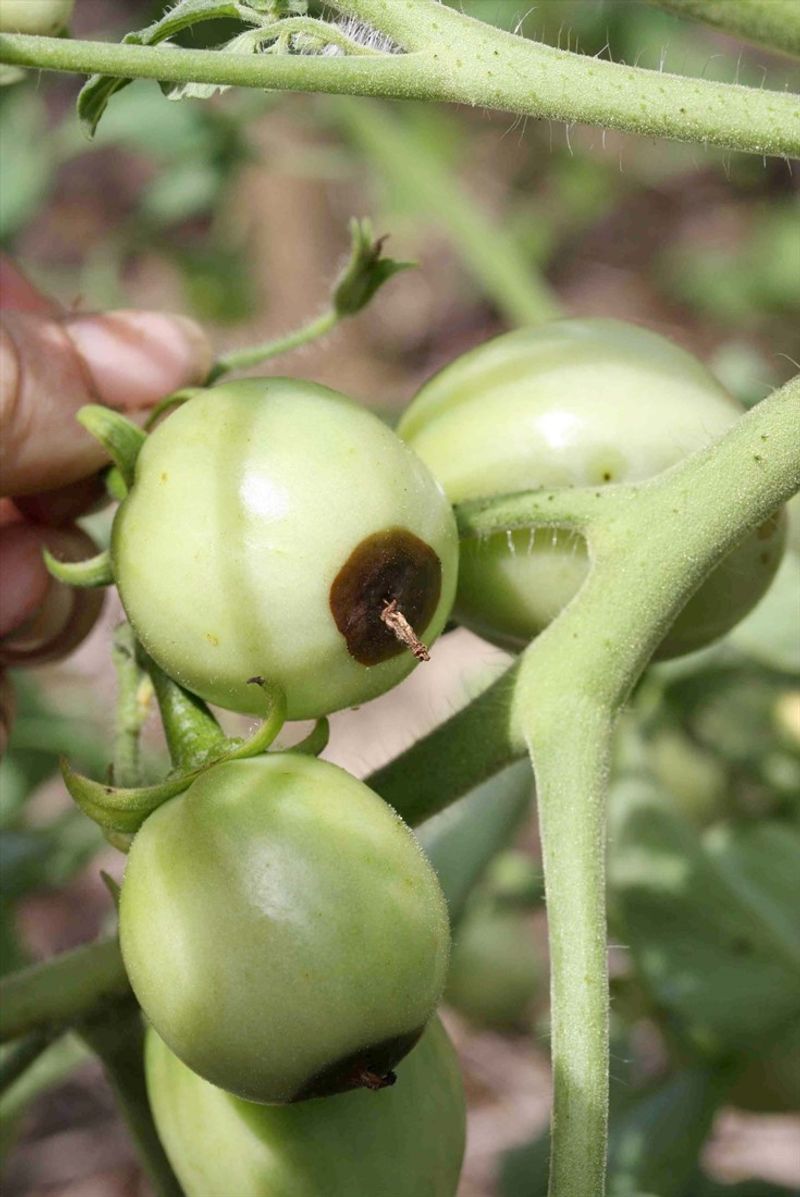
Gardeners often notice the problem right around harvest time, which makes it feel like something went wrong during ripening. The timing is misleading.
University of Georgia Extension’s Commercial Tomato Production Handbook explains that blossom-end rot generally begins during early fruit development, well before the tomato starts to color, and simply becomes more visible as the fruit enlarges and the lesion darkens. Ripening itself does not cause the disorder.
The underlying issue is commonly associated with inadequate calcium reaching the developing fruit cells at the blossom end. Calcium is relatively immobile inside plant tissue and travels primarily with water through the plant’s vascular system, so any disruption to water movement can limit how much calcium gets to fast-growing fruit.
University of Minnesota Extension notes that the fruit may suffer from localized calcium shortfalls even when the rest of the plant and the surrounding soil contain plenty of calcium.
Researchers continue to debate the exact starting point. One peer-reviewed review of blossom-end rot argues that environmental stress and cellular injury may occur first, with calcium loss following rather than initiating the damage.
A later reappraisal of the calcium hypothesis raises similar questions. The practical advice across both views stays consistent: protect developing fruit from water and root stress during the weeks when those cells are forming.
Check moisture consistency before reaching for calcium
Before buying any amendment, look at your watering pattern. Texas A&M AgriLife Extension identifies irregular watering as a key practical trigger for blossom-end rot, particularly the pattern of soil drying out and then receiving heavy irrigation or a soaking rain.
That swing in moisture availability disrupts the steady water movement that carries calcium to developing fruit.
Waterlogged roots create the opposite problem but a similar outcome. Roots sitting in saturated, poorly drained soil cannot function normally, which also limits water and nutrient uptake.
University of Minnesota Extension is clear that both drought stress and excessive moisture can interfere with normal uptake, so the target is even moisture without saturation throughout flowering and fruit development.
Describing steady moisture as the fix does not mean it is the only possible explanation for every case. Soil pH, fertilizer levels, root health, heat, salinity, rapid growth, and cultivar differences can all play a role, as noted by UGA Extension’s guide on calcium nutrition of tomato and pepper.
Consistent moisture is the most useful first behavior to correct because it supports normal water and nutrient movement, not because it proves a single settled cause. Think of it as removing the most common obstacle rather than guaranteeing a cure.
Build a watering routine for heat, rain, and soil type
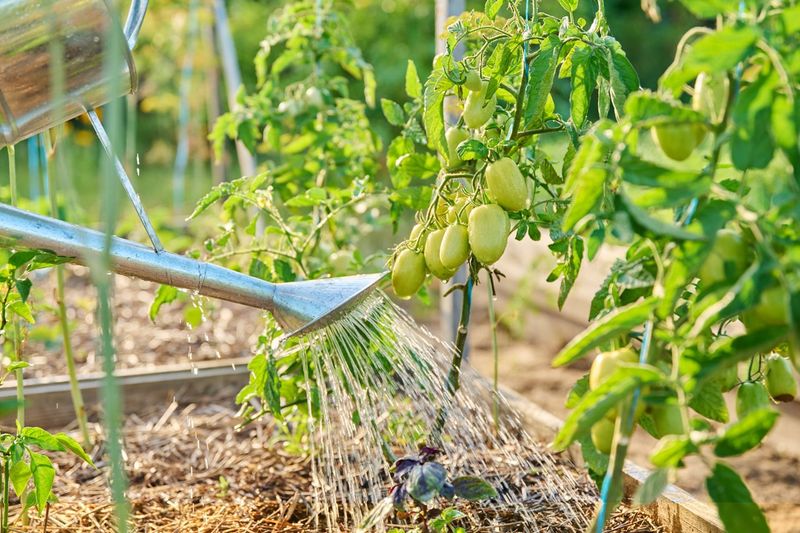
Deep watering is more effective than frequent shallow watering. Push water down far enough to wet the active root zone, then let the top inch or two of soil guide your next watering rather than sticking to a fixed schedule.
UGA Extension’s watering practices guidance recommends checking soil conditions directly and adjusting frequency to match actual plant demand.
A general benchmark of about one inch of water per week gives you a starting point, but Southern growing conditions can push that number higher quickly. Tattnall County UGA Extension points out that Texas heat, wind, and sandy soils increase water demand significantly.
Container-grown tomatoes dry out faster than in-ground plants and may need attention every day during a heat wave. Heavy clay soil holds more moisture and may need less frequent irrigation, especially after rain.
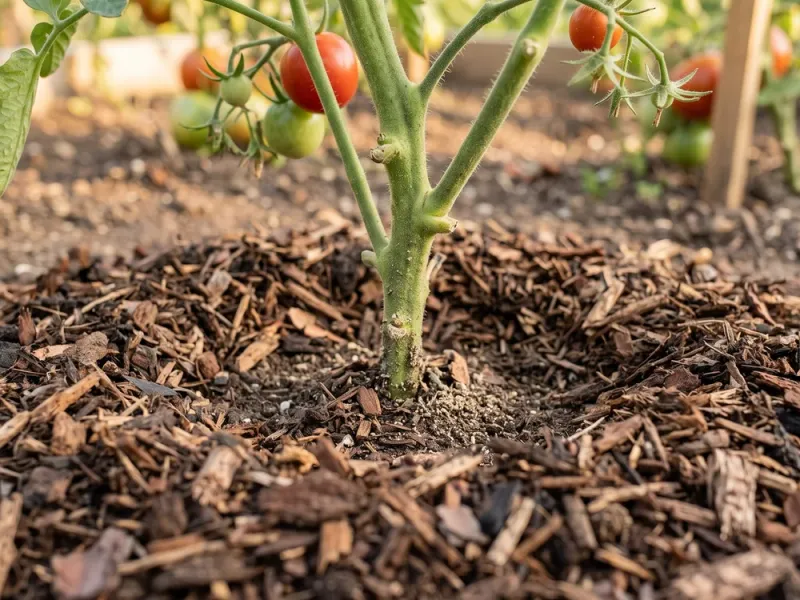
Mulch is one of the most practical tools for evening out moisture between waterings. A two-to-three-inch layer of straw, bark, or shredded leaves slows evaporation, moderates soil temperature, and reduces the sharp wet-dry swings that stress developing fruit.
Keep the mulch an inch or two away from the stem to allow air circulation. UGA Extension’s home vegetable garden disease management guide also recommends drip irrigation, soaker hoses, or careful hand watering at the soil line, which delivers water directly to the roots and keeps foliage dry to reduce foliar disease pressure.
Skip extra fertilizer and untested amendments
Reaching for fertilizer after seeing blossom-end rot is a natural instinct, but it will not repair fruit that is already damaged. Extra nitrogen is especially counterproductive.
Heavy nitrogen applications push plants into rapid leafy growth, and University of Minnesota Extension notes that this kind of fast vegetative growth is associated with higher blossom-end rot risk, likely because calcium cannot keep pace with the demand from rapidly expanding tissue. Fertilize according to a soil test and product label rather than adding more as a rescue measure.
Eggshells are a popular home remedy, but they decompose too slowly in a single growing season to change calcium availability in any meaningful way. University of Minnesota Extension’s review of common soil health home remedies confirms that eggshells do not reliably prevent blossom-end rot.
Epsom salt is a separate problem: it supplies magnesium, not calcium, and excess magnesium can actually compete with calcium for uptake by plant roots, making the situation worse rather than better.
Foliar calcium sprays are marketed as a quick fix, but research on their effectiveness is inconclusive. Calcium does not move readily from leaf tissue into developing fruit, so spraying leaves often delivers little benefit where it is needed most.
UGA Extension’s calcium nutrition guide recommends a soil test before applying lime, gypsum, or any other calcium source. Lime also raises soil pH, so applying it without knowing your baseline can create a different nutrient problem while doing nothing to help the tomatoes already on the plant.
Protect roots while the next fruit develops
Correcting your irrigation is the most important step, but the roots doing the actual water and nutrient uptake need protection too. Digging, hoeing, or cultivating close to the plant base can sever shallow feeder roots without any visible warning.
Those roots are exactly the ones pulling water and calcium toward developing fruit, so University of Minnesota Extension advises avoiding deep soil disturbance within the drip line of the plant once it is established.
Severe pruning, particularly removing large portions of foliage at once, can also trigger a stress response that disrupts normal uptake. Poor drainage, high soil salinity, and extreme heat all add stress on top of whatever watering inconsistency already exists.
Any combination of these factors raises the risk, which is why blossom-end rot can appear even when a gardener feels confident the watering schedule is reasonable.
Cultivar choice also plays a role worth acknowledging. Large slicer and paste-type tomatoes tend to be more susceptible than cherry types, partly because their bigger fruit requires a higher and more sustained calcium supply during development.
UGA Extension’s calcium nutrition guidance notes that some varieties perform better than others under similar conditions, though no variety is fully immune. If blossom-end rot is a recurring problem in your garden, switching to a smaller-fruited or less susceptible variety is worth considering alongside the moisture and root-care improvements.
Remove affected fruit and use caution before eating it
Blossom-end rot does not heal. Once that tissue is damaged, no amount of improved watering or added calcium will reverse the lesion already there.
Removing affected fruit is still worthwhile because it can allow the plant to put its resources into the next fruits forming on the vine. University of Minnesota Extension confirms that later fruit often develops normally once moisture and root conditions improve, so pulling the damaged ones is a practical forward-looking step rather than a loss to mourn.
Whether a tomato with blossom-end rot is safe to eat depends on the extent of the damage. A small, dry, localized lesion that has not spread or softened significantly can sometimes be trimmed away, and the rest of the fruit eaten fresh.
However, UGA Extension’s Murray County guidance on controlling blossom-end rot cautions that secondary organisms can colonize damaged tissue. Any tomato that is broadly soft, moldy, foul-smelling, or heavily decayed should be discarded rather than eaten.
UGA Lincoln County Extension also advises against using blossom-end rot-affected or otherwise damaged tomatoes for home canning, where produce quality directly affects food safety.
If trimming and examining a fruit leads you to question whether the damage really matches the blossom-end rot pattern, reconsider other possibilities. Sunscald creates pale, papery patches on sun-exposed sides.
Anthracnose produces circular, slightly sunken spots that can appear in scattered areas. Bacterial or fungal soft rots tend to be mushy and foul-smelling from the start.
Texas A&M AgriLife Extension’s blossom-end rot guide is a useful reference for comparing these visual differences before deciding on next steps.
Make consistency the first correction, not the only explanation
Uneven moisture is the single care issue most worth checking first when blossom-end rot appears, but it is not the only explanation, and fixing it is not a guaranteed cure for every situation. Texas A&M AgriLife Extension and UGA Extension’s calcium nutrition guide both identify soil conditions, root health, fertilizer levels, pH, heat, and variety as contributing factors alongside moisture management.
A practical sequence to follow: confirm the lesion is at the blossom end, remove affected fruit, maintain even root-zone moisture without waterlogging, apply mulch, protect roots from cultivation and injury, hold off on extra nitrogen, and skip unproven home remedies. University of Minnesota Extension recommends a soil test before adding any lime, gypsum, or calcium amendment, since pH and existing nutrient levels determine whether an amendment will help or create a new problem.
Most gardeners who steady their watering and protect their root zone see fewer problems on the fruit still developing later in the season. A healthy root system in consistently moist soil is the foundation everything else depends on.