
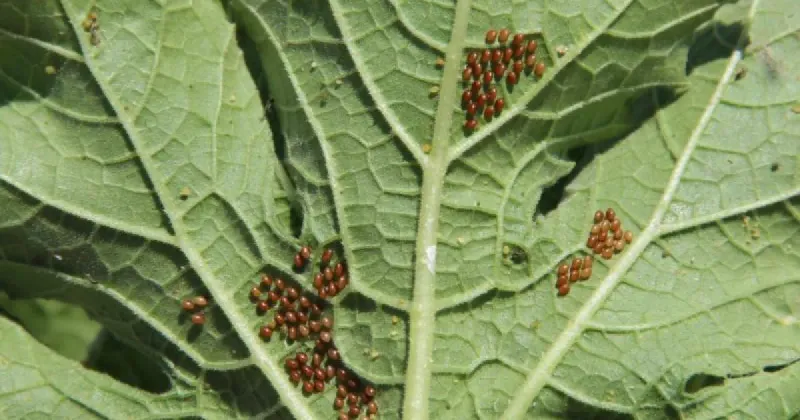
Squash leaves can go from healthy to speckled and droopy in what feels like overnight, and the first instinct is usually to blame the summer heat. Heat and drought are real possibilities, but so are squash bugs, vine borers, and bacterial wilt – and each one calls for a different response. Flipping a leaf over and knowing what you’re looking at can save you a lot of guesswork and help you act before a manageable problem becomes a lost plant.
Wilt alone does not identify the culprit
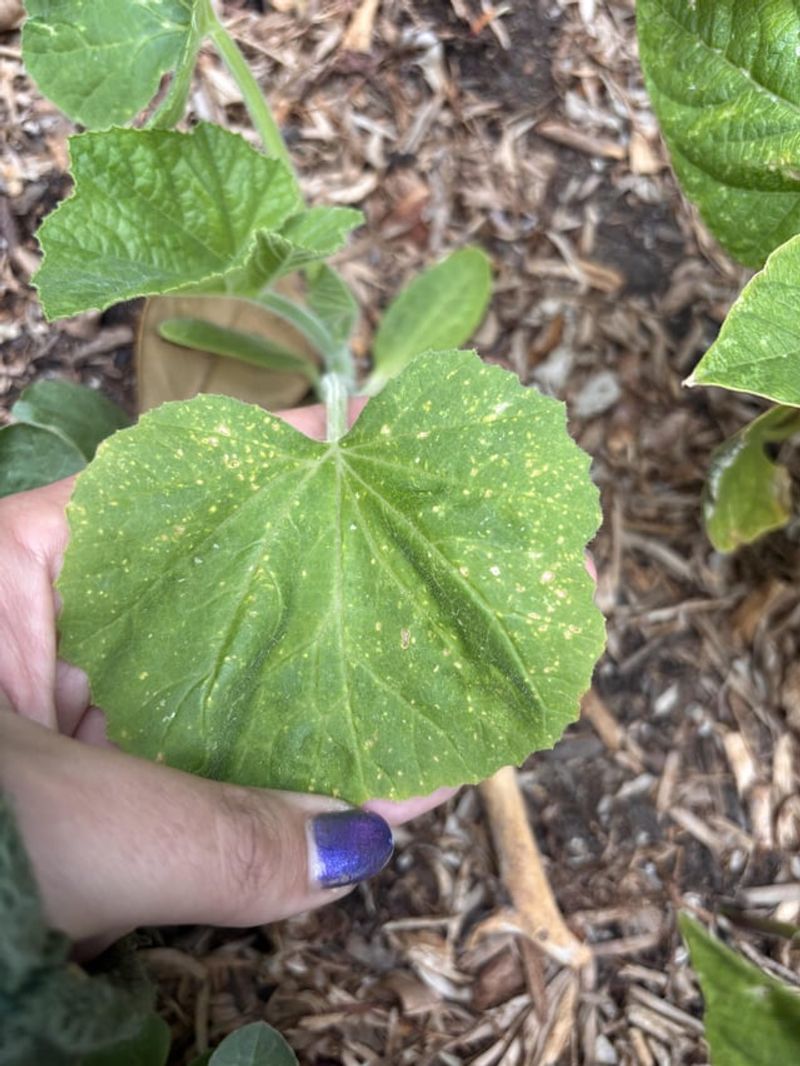
Squash leaves that suddenly droop, yellow, or develop pale speckled patches are sending a distress signal, but the signal does not name a single cause. Heat, drought, squash bug feeding, bacterial wilt, and squash vine borer damage can all produce overlapping symptoms on the same plant, sometimes on the same day. Jumping straight to egg removal or pesticide use before checking for these other possibilities risks missing what is actually wrong.
One useful first observation is timing. Wilt that appears during the hottest part of the afternoon and then partially recovers by the next morning may reflect heat or water stress, though squash bug feeding and bacterial wilt can produce similar patterns, so overnight improvement alone does not clear a plant. Check soil moisture at the root zone before anything else, and think about whether recent days have been unusually hot or dry.
If watering and temperature do not explain the symptoms, University of Minnesota Extension’s cucurbit wilt diagnostic guide outlines several competing causes worth checking at the same time, including squash vine borer and bacterial wilt. Look for squash bug evidence – eggs, nymphs, or adults – before treating for them. Wilt on its own does not confirm a squash bug infestation, and acting on an unconfirmed diagnosis wastes time you could spend on the real problem.
The telltale eggs hide beneath the leaves
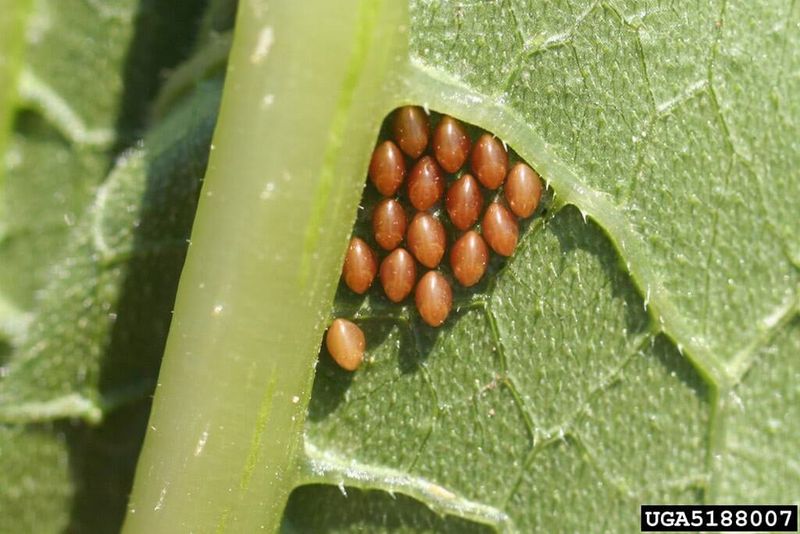
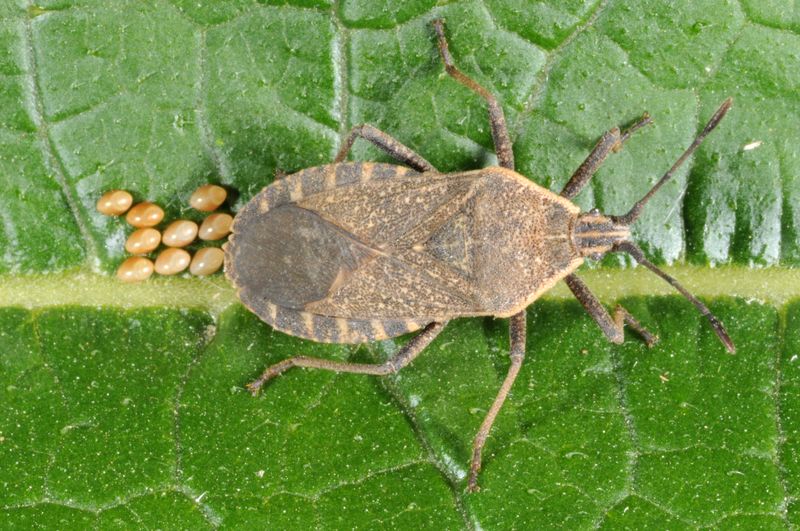
Confirming a squash bug problem starts with looking in the right place. Turn leaves over and examine the undersides, focusing on the areas between the veins, which is where squash bugs most commonly deposit their eggs. UC IPM’s squash bug pest management guidelines describe the eggs as oval, bronze, reddish, copper-colored, or yellowish, and typically arranged in tidy clusters of roughly 12 to 40 eggs. That distinctive metallic color and geometric grouping sets them apart from the eggs of many other insects.
Identification matters before you remove anything. Several other insects lay eggs on cucurbit leaves, and not every cluster you find belongs to a squash bug. Take a close look – or compare to a reference photo – before deciding to crush or remove a cluster. Some of those other eggs may belong to beneficial insects you would rather leave alone.
The inspection should extend beyond the leaf surface. Check stems, vines, the base of the plant, and any nearby debris or boards where squash bugs may be sheltering. University of Minnesota Extension’s squash bug guide notes that young plants and flowering plants can be particularly vulnerable, so pay extra attention to any plant that is still establishing or just beginning to bloom. Finding eggs, nymphs, or adults confirms that squash bugs are present and gives you a real target to work with.
Nymphs and adults create the feeding damage
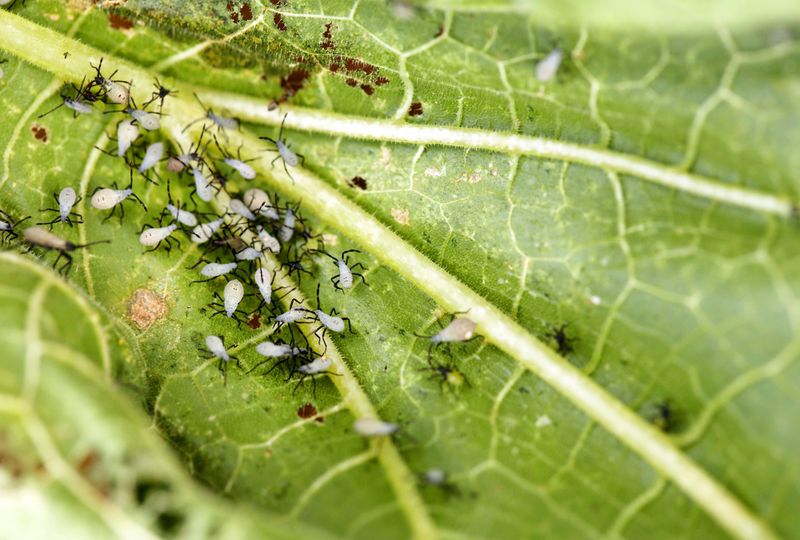
Here is the biology that corrects the article’s original premise: squash bug eggs do not feed. They sit on the leaf surface and develop, but they do not pierce tissue or draw sap. The feeding damage – the speckling, the yellowing, the wilting – comes from the nymphs that hatch from those eggs and from any adults already working through your garden.
Both nymphs and adults use piercing mouthparts to penetrate plant tissue and extract sap. UC IPM’s squash bug guidelines explain that this feeding first shows up as small pale or speckled spots on the leaf surface. Sustained feeding by a larger population can progress to yellowing, browning, crisp or blackened leaf edges, wilting, damaged fruit, and eventually plant collapse during a heavy infestation. The progression depends on how many bugs are feeding and how long they have been at it.
An egg mass on a leaf underside is therefore a warning about what may be coming, not an explanation of what is already happening. Utah State University Extension’s squash bug research guide reinforces this point: if a plant is already showing significant wilt or tissue damage, look for nymphs and adults actively feeding on stems and leaf undersides, because they are the life stages responsible for current injury. The eggs represent the next generation; the bugs already on the plant are the ones doing harm right now.
Remove confirmed egg masses without promising a cure
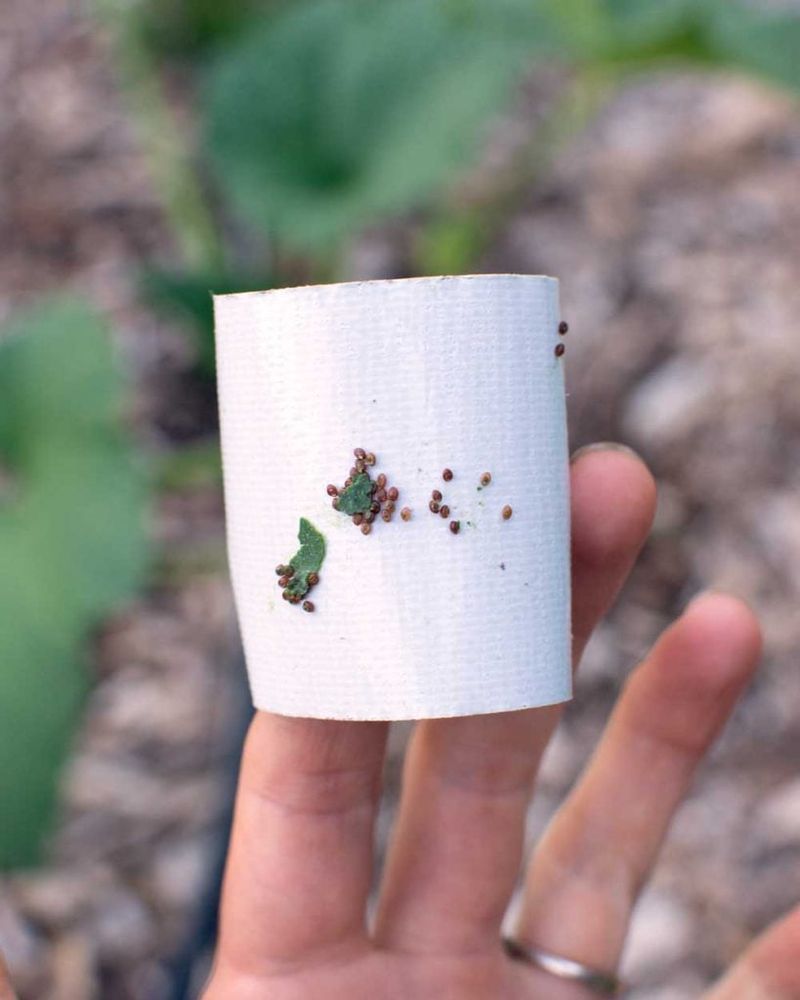
Once you have confirmed that a cluster is squash bug eggs, you have a few practical options for removing them. You can crush the eggs directly against the leaf with your finger or a tool, peel off the section of leaf carrying the cluster and drop it in a sealed bag or bucket of soapy water, or press a strip of duct or packaging tape against the eggs and lift them cleanly away. Utah State University Extension’s squash bug management page lists all three approaches as practical options for a small home garden.
What egg removal does is target the next generation before it hatches. It may reduce future feeding pressure when you combine it with ongoing removal of nymphs and adults, but it cannot reverse vascular or tissue damage that has already occurred. A plant that is already wilting significantly will not perk up just because the egg masses are gone, especially if adults or nymphs are still present and feeding.
Hand removal of nymphs and adults belongs in the same routine. Drop them into a container of soapy water, which prevents escape. One nuance worth knowing: USU Extension’s squash bug research guide notes that parasitoid wasps sometimes attack squash bug egg masses, so not every cluster you find is necessarily viable or unoccupied by a beneficial insect. Egg removal is still a reasonable home-garden action, but it is not the only ecologically appropriate response, and it works best as part of a repeated scouting and removal routine rather than a single intervention.
Repeat scouting every two to three days
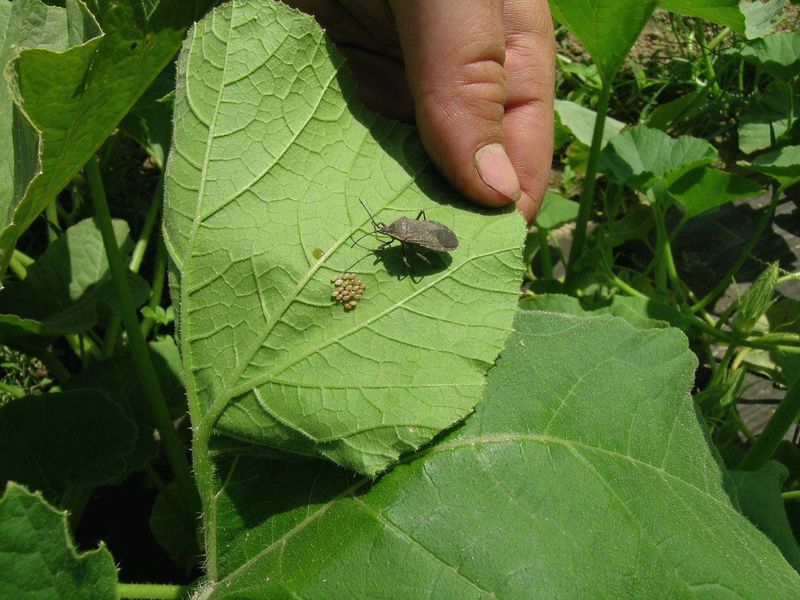
A single inspection and removal session is rarely enough to get ahead of squash bugs. Eggs, nymphs, and adults can be present at the same time, and new eggs can appear between checks. Utah State University Extension’s squash bug research guide recommends mechanical control and scouting approximately every two to three days during an active infestation, framing it as a way to reduce pressure and catch new life stages rather than a guaranteed method of elimination.
Eggs generally hatch in roughly 7 to 14 days depending on temperature and conditions, according to University of Minnesota Extension’s squash bug resource. That window means a mass you missed on Monday could be producing newly hatched nymphs by the following week. Newly hatched nymphs are more vulnerable to physical removal and to labeled insecticides than older nymphs or adults, so catching them early gives you a meaningful advantage.
Each scouting session should cover the undersides of leaves, stems, vines, the base of the plant, and any nearby debris. One additional technique that USU Extension recommends is placing a piece of board or flattened cardboard near the plants in the evening and then checking underneath it first thing in the morning. Squash bugs tend to shelter in dark, protected spots overnight, and a board gives them a predictable place to gather, making it easier to collect and destroy a significant number at once. The routine works best when you stick to it consistently through the peak of midsummer activity.
Check the stem and watering before escalating
Before deciding that squash bugs fully explain what is happening, run through the other common midsummer causes of sudden wilt. Start with water. Push a finger or a small trowel a few inches into the soil near the root zone and check whether it is genuinely moist. Plants in dry soil during a heat wave can wilt dramatically even without any pest activity, and addressing a water deficit costs nothing and takes two minutes.
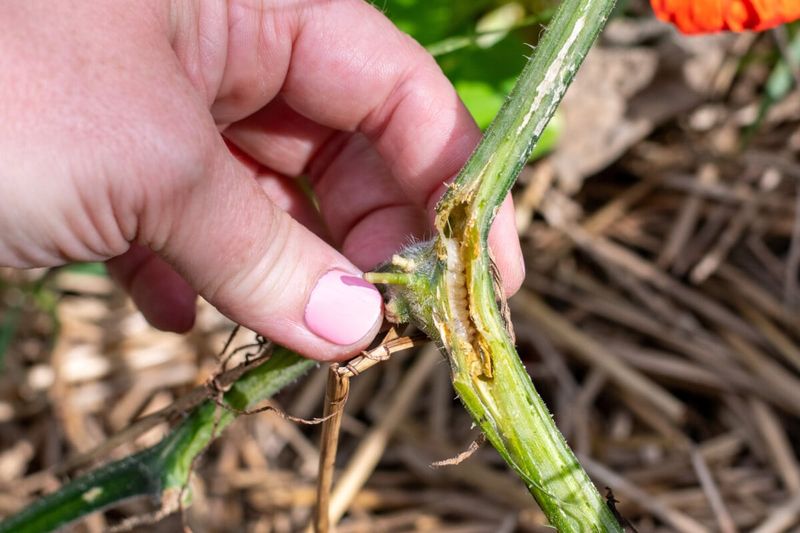
Next, look at the stem base. Squash vine borer is a serious midsummer pest that causes sudden, severe wilt and is easy to confuse with squash bug damage from a distance. The key difference is physical evidence at the stem: look for small entrance holes and a crumbly, sawdust-like material called frass near the soil line. University of Minnesota Extension’s wilt diagnostic tool lists vine borer as a major cause of collapse in squash and pumpkins.
Vine borer eggs are also laid on stems near the soil, not in clusters on leaf undersides, which helps separate it from squash bugs.
Bacterial wilt is another possibility, though it is more commonly associated with striped or spotted cucumber beetles than with squash bugs. University of Minnesota Extension’s bacterial wilt guide explains that the disease is caused by a bacterium the beetles carry and introduce during feeding. Once a plant is infected, pesticides cannot cure it. If you see cucumber beetles on the plant alongside the wilt, that combination warrants its own investigation separate from the squash bug question.
Sorting out which problem you actually have before reaching for any treatment saves time and avoids making a manageable situation worse.
Use labeled sprays only when they fit the situation
Pesticides are a conditional option, not the automatic next step after finding one egg mass. Mechanical removal, repeated scouting, and hand-picking nymphs and adults are the starting point for most home gardens. If those methods are not keeping pace with the infestation and you have confirmed squash bugs as a significant contributor to plant decline, a labeled insecticide may be appropriate.
The product label is the legal document that governs every aspect of use: which crops are covered, which pests are listed, the application rate, the pre-harvest interval, and any restrictions on when and how to apply. UC IPM’s squash bug pest management guidelines note that insecticides generally work better against newly hatched nymphs than against eggs, older nymphs, or adults, and that the spray must reach the undersides of leaves and the lower canopy where squash bugs actually shelter. A spray that only hits the top surface of the leaves is unlikely to make much difference.
Pollinator safety requires more than choosing a time of day. EPA guidance on pollinator protection makes clear that blooming plants, active forager presence, and every label restriction must govern application decisions. Evening timing can reduce some exposure risk, but it is not a blanket exemption from label requirements. Some products carry explicit restrictions against application during bloom or near flowering plants regardless of time.
Do not use dish soap, concentrated cooking oils, or any product that is not specifically labeled for the crop and pest – EPA pesticide safety guidance is clear that off-label improvised remedies carry unpredictable risks to the plant, the garden, and the surrounding environment.
Reduce shelter and pressure after harvest
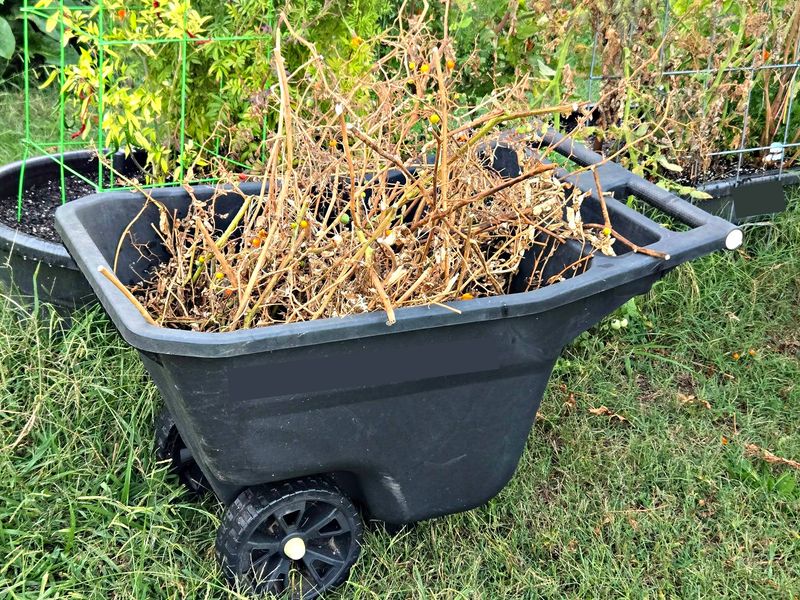
Adult squash bugs overwinter in protected spots: under plant debris, boards, wood piles, leaf litter, and similar shelter near the garden. Removing that shelter after the growing season can reduce the number of adults that survive to lay eggs the following spring, though it will not eliminate squash bugs from a yard or neighborhood entirely.
After harvest, pull and dispose of cucurbit vines, stems, and any remaining fruit. Reduce or relocate nearby boards, wood, and debris piles that could serve as overwintering cover. UC IPM’s squash bug guidelines include end-of-season sanitation as part of an integrated management approach precisely because it addresses the population before it has a chance to establish in spring.
Host choice is also worth considering for future seasons. Squash and pumpkins tend to be heavily targeted, while some types such as butternut may tolerate or resist squash bug pressure better than certain summer squash varieties. Utah State University Extension notes this variation without describing any variety as completely immune, which is the honest framing – relative resistance is a real factor, but no plant is off the squash bug’s list entirely. The sequence that holds through the whole season stays the same: verify what you are seeing, remove confirmed eggs and live bugs, repeat checks every two to three days, and investigate other causes when the evidence does not add up to squash bugs.
A garden that ends the season clean simply starts the next one with a little less pressure to manage.